|
OverviewFor this assignment you will be learning about multiple watercolor techniques. We will practice each technique as a class and then you will use those techniques to create your own, original piece of art.Your painting just has to meet the following watercolor requirements:
The videos and examples below show you how to demonstrate each technique for practice as and how to apply those techniques to create a finished painting. There are photo galleries that show different types and styles of watercolor paintings to help you determine what style you might like to paint in as well. Make sure you look at all of these resources and turn in your practice techniques before you sketch and plan your final piece. |
|
Practice
The first video shows you how to practice 10 different techniques. The photo to the left shows you how to lay out your practice page and which of these techniques we are focusing on. |

|
Application
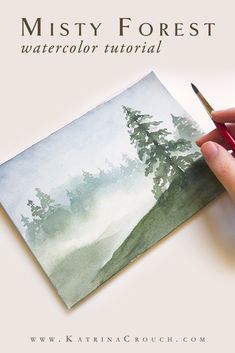
Here are some examples of what you can achieve with the wet on wet and layering techniques. Pay close attention to how the artists control the watercolor by allowing certain sections dry. Sometimes that is to keep sections from blurring and to keep edges sharp. Other times it is to make sure that layers stack and don't blend together. There are tons more youtube tutorials on applying our techniques. Once you know what techniques you want to focus on, see if you can find examples, tutorials or time lapse videos to help you prepare for you project.
Here are some examples of what you can achieve with the wet on wet and layering techniques. Pay close attention to how the artists control the watercolor by allowing certain sections dry. Sometimes that is to keep sections from blurring and to keep edges sharp. Other times it is to make sure that layers stack and don't blend together. There are tons more youtube tutorials on applying our techniques. Once you know what techniques you want to focus on, see if you can find examples, tutorials or time lapse videos to help you prepare for you project.
|
|
|
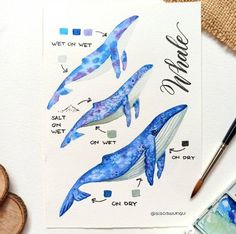
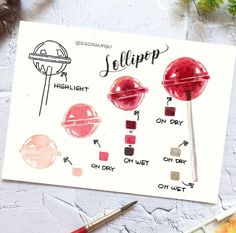
Layering
Click to enlarge the images below to see how artists use layers to build up colors and shadows. Notice how the white of the paper is used for highlights.
Click to enlarge the images below to see how artists use layers to build up colors and shadows. Notice how the white of the paper is used for highlights.


Possibilities
The gallery below is for inspiration only- do not copy any of these paintings or any paintings that you find online. You can use photographs (not paintings) as source images to help you achieve accurate proportions, recreate lights mediums and darks, create textures, and just inform your painting in general. Using/copying someone else's artwork is plagiarism and should be avoided at all costs!
The gallery below is for inspiration only- do not copy any of these paintings or any paintings that you find online. You can use photographs (not paintings) as source images to help you achieve accurate proportions, recreate lights mediums and darks, create textures, and just inform your painting in general. Using/copying someone else's artwork is plagiarism and should be avoided at all costs!
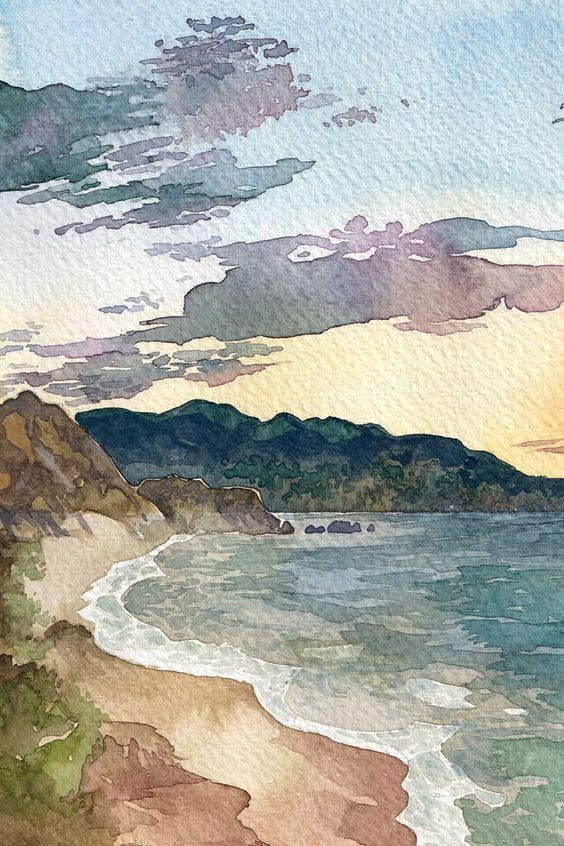
Landscapes
Notice the different styles and color choices. Some landscapes are more realistic than others, but they all achieve the goal of smooth blends and fills, the ability to mix different hues, and the ability to achieve multiple values using the white of the paper as highlights. Remember, if you choose one of these styles, you still need to have a photo as reference and not someone else's painting or drawing.
Notice the different styles and color choices. Some landscapes are more realistic than others, but they all achieve the goal of smooth blends and fills, the ability to mix different hues, and the ability to achieve multiple values using the white of the paper as highlights. Remember, if you choose one of these styles, you still need to have a photo as reference and not someone else's painting or drawing.


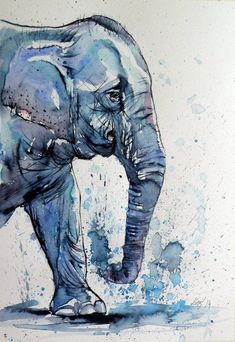
Animals
Notice how again, even though some are more realistic than others, they all show the ability to blend and fill smoothly, achieve color mixes, and achieve a range of values using the white of the paper as highlights. You can add pen as an accent after you finish painting if you choose that style. Make sure you are using photos as sources and not someone else's work.
Notice how again, even though some are more realistic than others, they all show the ability to blend and fill smoothly, achieve color mixes, and achieve a range of values using the white of the paper as highlights. You can add pen as an accent after you finish painting if you choose that style. Make sure you are using photos as sources and not someone else's work.


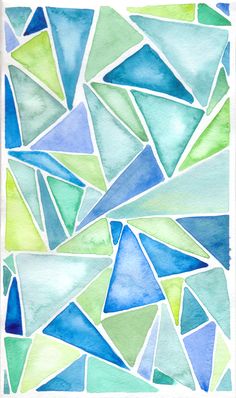
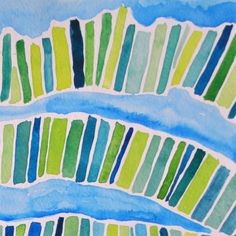
Geometric Patterns
Sometimes the simplest shapes can make the most stunning pieces. If you choose to do this option, craftsmanship is key. Make sure to demonstrate your watercolor techniques and hide your pencil lines. You also want to make sure that your page doesn't look too empty and that you have a balanced composition. Be sure to allow dry time and/or leave dry paper between your shapes or they will all blur together.
Sometimes the simplest shapes can make the most stunning pieces. If you choose to do this option, craftsmanship is key. Make sure to demonstrate your watercolor techniques and hide your pencil lines. You also want to make sure that your page doesn't look too empty and that you have a balanced composition. Be sure to allow dry time and/or leave dry paper between your shapes or they will all blur together.


Splatter and Pen
This technique is also deceptively simple. It takes a lot of control to achieve this look because your splatters need to fit your pen accents and demonstrate color mixing and value shifts. Mapping out your splatters in clean water first to prime your paper is a necessary step. As always, make sure your composition is balanced as well.
This technique is also deceptively simple. It takes a lot of control to achieve this look because your splatters need to fit your pen accents and demonstrate color mixing and value shifts. Mapping out your splatters in clean water first to prime your paper is a necessary step. As always, make sure your composition is balanced as well.